Quite often, during a presentation with a report or a report, a presentation of a new program or product, it becomes necessary to visualize some information in front of the public. The most popular program for this is Microsoft PowerPoint 2007, an environment for creating presentations with various effects. Now, almost no event, such as a seminar, conference, diploma defense, is complete without graphic support created in Power Point. The development of technology has made it possible to reproduce presentations not only on a computer or TV screen, but also on interactive whiteboards and using projectors.
Power point overview
Making a presentation on a computer is not the only feature in Microsoft Power Point. With this program it is possible:
- impress the audience with an informative presentation;
- create graphic support for the target flow of people;
- scale slides by enlarging or reducing the desired areas;
- quickly switch slides, both automatically and manually;
- design a unique graphic support for the report;
- use both your own and the themes and designs developed by the program manufacturer;
- quickly and easily create the desired charts, graphs, etc.;
- add various visual and sound effects.
Video: business presentation
Components of a presentation
The presentation consists of slides, the number of which is practically unlimited. They are sequentially collected into a single file with the ".ppt" extension, which can be opened on any computer where the Microsoft Power Point program is installed.
Slides can be shown electronically or printed on paper.
On the slides you can place everything you need for the demonstration:
- text information;
- photographs, pictures, drawings, etc.;
- tables, graphs, charts;
- videos, films, clips;
- audio files;
- other graphic objects.
Slides in Power Point can be customized and modified:
- size;
- markup (location of objects on it);
- template (design and layout);
- visual and sound transition effects.
The initial editor window in the program looks like this:

The Menu bar contains all the important commands of the program, and the main and frequently used options are placed on the toolbar. This panel can be edited by adding or removing certain elements. By clicking on the "Create Slide" button, an empty template will appear on the screen, on which you have to work.
The left panel displays all the slides that make up the presentation. They can be in the form of their thumbnails, or they can be displayed in structured text, displaying headings or slide content. Also in this panel, you can move and change the position of the slides. The task pane (located on the right) will display the actions that you can use in the process of creating a show. At the bottom of the screen there is a Notes area where you can enter all comments on the created slide, which are visible only in the process of working on the presentation.
All areas on the home screen can be enlarged or reduced by placing the cursor on their end lines.
How to make your presentation step by step
There are several ways to create a presentation for an interactive whiteboard:
- develop a completely new presentation;
- from a standard or previously made template;
- from an already prepared file;
- from the autocontent wizard.
If we look in more detail, then in the new demo you need to do all the markup, design styles, fonts, etc. yourself. Reworking a finished presentation will not end up with a unique product. Choosing a template is similar to the previous method and allows you to use ready-made graphic and design developments from the creators of the program. If you use the "Auto Content" wizard, the program will ask you questions, and based on the answers, it will create the desired presentation template.
Start of creation
To start creating a slide show, you need to open the desired program.
This can be done via:
- Start;
- Programs;
- Microsoft Office
- Microsoft Office PowerPoint 2007.
In the open program, a working window will appear in which you must select one of the previously listed methods for creating a slide show.
Video: Presentation in Power Point 2007
We do according to the template
You can create a beautiful presentation with a large number of Power Point templates. They include ready-made, in terms of design, slides where you need to enter data. Templates take into account:
- Background color;
- Slide color schemes;
- Fonts, etc.
You can create a slide show from a template through the menu:
- File;
- Create;
- Create a presentation;
- Templates.
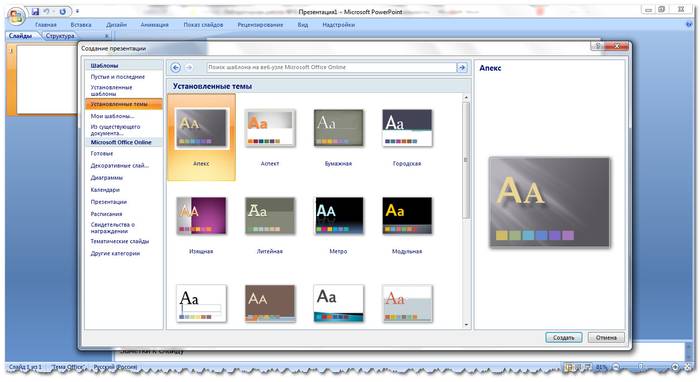
Select the desired template and click "Create". A slide of the selected style will appear in the work area, which can be edited.

Loading slides
To create a new slide, click on the corresponding button on the toolbar. You can also do this by right-clicking on the slide thumbnail in the window on the left, choosing the same command.

In the presentation structure area, you can copy or delete slides by selecting them and pressing the corresponding keyboard buttons. Or through the menu that opens with the right mouse button when you click on the slide.
Slides can also be swapped:

You can change the layout of the finished slide through:
- Home;
- Layout.

Text is entered in special fields on the slide. When marking a slide, a place for text is already allocated automatically, but you can also add it to other places through the "Insert-Inscription" control panel item. Enter text in the field that appears.

The size of the input field will expand as you add text. You can finish entering by clicking on any free area of the slide.
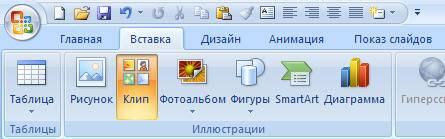
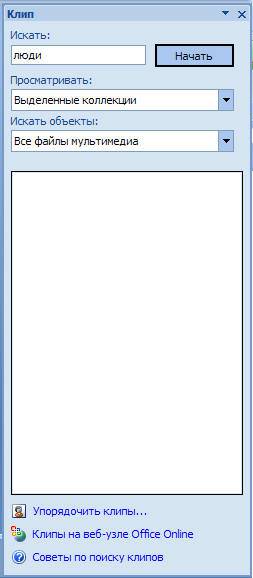
You can insert a picture or your picture using the command:
- Insert;
- Drawing.

Or by clicking on the picture in the slide layout itself:

In the window that opens, select the desired file location and the image itself, and then click the "Insert" button. If you select "Clip", you will be prompted to find the image among the standard pictures of the program.
Any field on the slide can be moved and resized.
For this you should:
- click once on the desired object:
- then move the cursor over its borders - the option to change will be available.
It is possible to add sound, video, tables, graphs, charts and autoshapes to a slide. Their buttons are in the workspace of the slide and in the "Insert" menu. There are quite a lot of options for each object, and the accessible design of Microsoft Power Point makes it possible to quickly understand them.
New design
You can change the design of the site through the menu:
- Design;
- Themes.

It has subsections:
- Colors;
- Fonts;
- Effects.
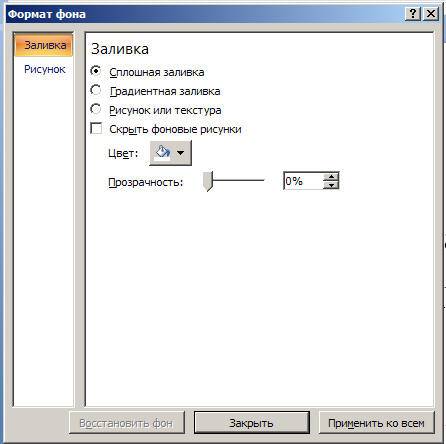
You can apply the selected theme to the entire show or to a single slide. The color scheme within a particular theme can also change. To do this, click on the corresponding column in the design area. Select the scheme and right-click on it, applying it either to the entire presentation or to the selected slide: You can make your own image or fill as a background:
- Design;
- Background styles;
- background format.

In this window, you can select the fill type:
- solid;
- Gradient (smooth transition from one color to another);
- Pattern or texture.
Text formatting is an important step in creating a slide show. A lot depends on the readability of the test.
To edit you should:
- highlight the desired piece of text;
- then use the tools on the main taskbar.
By default, each new line in the text is treated as a bulleted list. This is changed via the toolbar. Power Point also contains buttons for setting special effects, text direction, changing line spacing, and so on. When a graphic image is selected in the working area of a slide, the "Work with Pictures" tab will appear on the toolbar.
There you can change:
- Brightness;
- Contrast;
- Display style;
- Color;
- Size.
Video: Presentation in 10 minutes
Animation
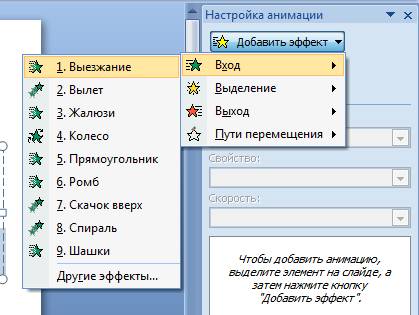
Slides filled with information should be given a beautiful visualization. This is done using "Animation Effects" in the "Slide Design" task pane. From a large list of effects, you can choose any for each object on the slide. Then during the demonstration they will beautifully appear on the screen. One effect is applied to one slide, but you can click the "Apply to all slides" button and it will be on all slides of the presentation.

You can also customize the animation for each object on the slide:
- select it and right-click, selecting "Adjust Animation";
- or go to the menu item "Animation" - "Animation settings".

Then a panel will appear on the right side, where you can add a separate effect to each object, as well as adjust its speed, soundtrack and appearance time.
Adding transitions
The transition is used when changing one site to another. A new slide can appear immediately or gradually. The gradual appearance makes the presentation more beautiful and interesting.
To set up a transition, select a slide and go to:
- Animation;
- Animation setting:
- Next, you should choose the transition effect you like, the sound for it and the speed of the process. An automatic transition is also configured (then its time is set) and by mouse click. The transition can be done for each slide separately, or you can set it up for the entire presentation at once.
Completion
At the end of the presentation, you should adjust the parameters of the slide show itself in order to avoid unpleasant moments during the presentation. This is done in the "Slide Show" - "Demonstration Settings" item:

All the main display parameters are set here:
- slide management;
- slide change;
- Slide numbers.
You can also hide slides in the Slide Show menu that you don't want to show temporarily, but that you can't delete.
You can view the finished work by clicking on the "From the beginning" button:
- Save as…;
- Choose a save location;
- Write the title of the work;
- Save.
Microsoft PowerPoint- an affordable and simple program for creating presentations on a computer. A variety of visual effects and design themes will allow you to quickly create an original and unique presentation for your public speaking or school assignment.
>Unlike the more powerful presentation editor, the free viewer lacks the ability to create and edit presentations. You can download Powerpoint Viewer for free in Russian, for example, for use on office computers, where you only need to play a presentation created at home.
Possibilities:
- viewing in full screen mode;
- print presentation slides.
Principle of operation:
when you start the program, you are automatically prompted to select the desired presentation to play it. Even a complete “teapot” will figure out how to use Powerpoint Viewer: after selecting the desired file, click on the “Open” button to start viewing the presentation in full screen mode.
Pros:
- support for formats of all versions of the program (*.ppt, *.pptx, etc.);
- Powerpoint Viewer can be downloaded for free;
- transitions between slides are displayed correctly.
Minuses:
- You cannot make changes to the document.
As the name of the program suggests, the word Viewer means "viewer". Therefore, in this program, you can only play presentations without being able to make changes. This is not always convenient, because sometimes you just need to add or correct something in the created work. Therefore, when creating a presentation, you need to check the finished version several times for errors.
When you show it through the viewer at a presentation in front of colleagues, there will no longer be an opportunity to edit your work due to the functional limitations of this program. The program has the status of free software, so Power Point Viewer can be downloaded quite legally for free. If you only need a program to play ready-made presentations, then you should choose a free viewer instead of a functional but paid presentation program.
PowerPoint 2013 is primarily an office application for creating presentations. PowerPoint 2013 and the word "presentation" have long become synonymous for many. The 2013 version has developed a more efficient interface designed for touch mobile phones and tablets. In order to simplify the development of design, there are a few more themes. Now you can easily view your notes on the monitor, while the entire audience is viewing only the slides. Thanks to this, it has become much easier and more convenient to conduct presentations.
Advantages and Disadvantages of PowerPoint
Instructions for step-by-step creation and editing of presentations;
+ a more extensive selection of templates and a choice of various color bright schemes;
+ increase on the screen of many important, but small objects of the presentation;
+ correcting and formatting colors, using new effects;
+ the ability to use SkyDrive;
+ playback can occur on widescreen equipment;
+ the ability to recover unsaved data;
- only one thing can be said about the minuses of PowerPoint 2013, the full package of Microsoft Office is not always correctly installed.
Key features
- the presentation is viewed without any additional connections in presenter mode. If the presentation is designed for a large audience, it is possible to see everything by clicking on the magnifying glass;
- widescreen themes appeared, which are more convenient to work with on large monitors;
- during the slide show it is possible to play music;
- it became possible to control the presentation on touch equipment simply by touching the screen;
- it is possible to copy several figures at the same time, by means of their union, grouping;
- adding various comments with working text, so that colleagues can see who and when, to whom they answered;
- when connected to the Internet in the SkyDrive service, you can save your files or on other sites and send them to other users for viewing, rating, editing;
- it is possible to copy several figures at the same time, by means of their union, grouping.
*Attention! When downloading the standard installer, you will need a pre-installed archiver, you can
Program Overview
Microsoft PowerPoint Viewer supports *.ppt, *pptx, *.pot, *.pptm, *.potm, *.pps, *.ppsx and *.ppsm files. However, it cannot check text for spelling errors, does not support bi-directional presentations, cannot open IRM-protected files, and does not support macros or graphics in EPS, PCT, EMZ, CDR, WMZ, WPG, and CGM formats. . As for the mobile version Microsoft PowerPoint, you can use it to create and edit presentations on devices with a screen size of up to 10.1 inches.
System requirements for a computer
- System: Windows 10, Windows 8 (8.1), Windows XP, Vista or Windows 7 (32-bit / 64-bit).
Phone system requirements
- System: Android 4.4 and above | iOS 11.0 and above.
| Features of PowerPoint Viewer on a computer |
| Open presentations in many formats, including password-protected ones. | |
| Copying slides to other programs. | |
| Print the entire presentation or specific slides. | |
| Support for "hot" keys. | |
| Full screen support. |
| Creation and processing of presentations | |
| In addition to viewing a presentation, you can edit and create new ones (add and change the background of presentations, format text, and insert interesting videos, various photos and pictures, music, diagrams, graphs and other objects). The rendered presentations will look the same on your computer as they do on your Android device. | |
| Saving presentations | |
| There is no need to save presentations after every change. This application will do it automatically. | |
| General access | |
| Thanks to data synchronization with cloud storages (OneDrive, Dropbox, SharePoint, Box, Google Drive), you can access presentations from any device, no matter where you are. You can also share presentations with specific people by sending links or email attachments. | |
| Collaboration | |
| PowerPoint will allow you to share presentations with other users. For example, with a project manager or work colleagues. | |
- Bugs fixed.
Microsoft Power Point is a presentation program included in the Microsoft Office package. The utility is used to create first-class displays that can be conveniently used during reports, lectures and, of course, presentations.

The most convenient PowerPoint tool can be downloaded for free directly from our website, the link is at the bottom of the page, but first we will tell you what this product is and why it is worth downloading. Everyone who, one way or another, used the program for their own purposes has already been able to evaluate it, maybe you will now join the ranks of admirers of the electronic "assistant".

PPT is convenience
Power Point helps the teacher organize the learning process more comfortably and completely abandon the usual chalkboards. Pictures, quotes, graphs, formulas and tables can now be displayed on a large screen and this greatly facilitates the presentation of information to students.


The presentation program has received many different new tools, in comparison with previous versions of PowerPoint 2010, 2007, 2003. But they have not lost popularity because of this.
Features of Power Point:
- the program can be used not only on a PC, but also on mobile devices;
- fixed and improved lecturer mode, it can be used on one monitor;
- added a lot of tools for working with design;
- improved algorithm for working with sound and video;
- support for files from other Microsoft Office programs; for example, you can use tables or graphs created in Excel in impressions;
- added features for the implementation of presentations, printing and albums. Supports access to the network to download the desired content.

The latest version of the Power Point application works with the data cloud. You can save your work from any PC and then open it anywhere. This is very convenient, given the fact that you can not open the content yourself, but provide access to it with a simple link. Working with OneDrive cloud storage allows multiple users to work on the same project at the same time.

Working with the latest version of Power Point software, you can create great presentations with graphics and animations, show slides with ease and display them on any screen without much effort. Another very convenient feature is that the person who is presenting the report will be able to use tips that other people will not see.

There is also an online version of the package from Microsoft, which includes Microsoft PowerPoint online.